
How To
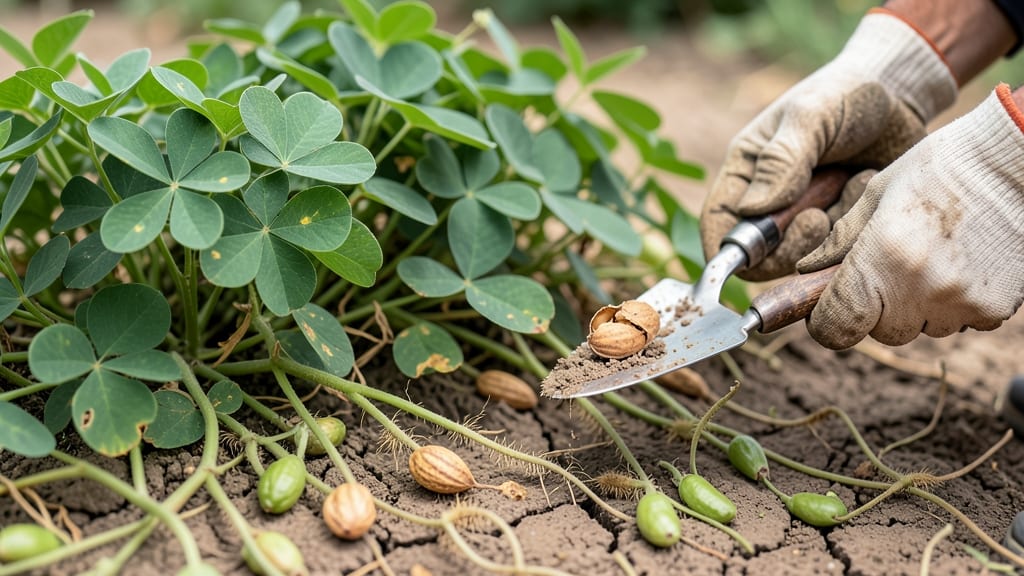
Knowing when to harvest peanuts means timing the shell hardness test just right — because these underground crops won’t give you a second chance if you dig too early or too late.
Peanuts aren’t your typical above-ground crop—they grow underground, and harvesting them too early or too late can mean the difference between buttery perfection and bland disappointment.
Most gardeners wait 120–150 days after planting, but the real trick is checking for dry, brown pegs and a hollow rattle when you shake the pods. Skip this step, and you risk digging up green, underripe peanuts—or worse, leaving mature ones in the soil too long.
Below, I’ll walk you through the exact shell hardness test, plus extra clues like leaf yellowing and soil conditions, so you never miss the perfect harvest window again.

The shell hardness test: how to check peanut ripeness before digging
Harvesting peanuts at the right time is an art and science—especially since they develop underground. The shell hardness test is my go-to method to avoid pulling them too early (when they’re bland) or too late (when they shrivel).
This simple tactile check tells you whether the pods have reached peak flavor and texture, saving you from guesswork.
Before digging, focus on three key clues: shell color, texture, and the sound when tapped. Mature peanut shells turn from green to tan or brown, feel dry and papery, and make a hollow rattling sound when shaken.
If you miss these signs, you risk harvesting peanuts that are either underdeveloped or woody.
Timing matters because peanuts need 120–150 days to mature, depending on your USDA zone. In warmer climates (zones 8–10), they may ripen faster, while cooler zones (6–7) could extend the season. The shell hardness test bridges this gap by giving you a real-time assessment, regardless of your location.
Here’s how to perform the test correctly—without damaging your crop:
Step 1: Locate the Peanut Pegs
Gently brush away soil around the peanut pegs (the stems that grow underground). Look for brown, dry pegs—these indicate mature pods.
Step 2: Check Shell Color
Use a small trowel to expose 1–2 pods. Mature shells should be tan or light brown, not green. Green shells mean immature peanuts.
Step 3: Test Shell Hardness
Press your thumb and index finger firmly on the shell. It should feel dry and papery, not soft or moist. Soft shells = underripe.
Step 4: Perform the Rattle Test
Shake the pod near your ear. A hollow, rattling sound means the peanut is ready. A dull thud = still developing.
Step 5: Confirm with Leaf Color
Above ground, yellowing leaves signal maturity. If leaves are still green, wait 1–2 weeks before retesting.
✅ Ready to harvest when shells are brown, dry, and rattle.
Pro tip: Test 3–5 pods from different plants to account for variability. If most pass the shell hardness test, it’s time to harvest. Never dig based on days alone—environmental factors like temperature and rainfall can shift maturity timelines.
If you harvest too early, peanuts will taste starchy and bland, lacking the rich, nutty flavor you crave. Overripe peanuts, on the other hand, become woody and shrunken, losing moisture and texture. The shell hardness test eliminates these risks by putting you in control.
For extra precision, pair this method with soil temperature checks. Peanuts mature fastest in 80–90°F soil. If your area hits a heatwave, pods may ripen 2–3 weeks early. Monitor both the shells and the weather to stay ahead of the curve.
Once you’ve confirmed ripeness, dig carefully with a wide fork or shovel, lifting plants by their stems to avoid crushing pods. Lay them in the sun for 2–3 hours to dry before storing—this prevents mold and extends shelf life.
Mastering the shell hardness test turns peanut harvesting from a gamble into a rewarding skill. With practice, you’ll recognize the perfect moment when peanuts are firm, flavorful, and ready to enjoy.
Additional signs your peanuts are ready for harvest (beyond shell hardness)
While the shell hardness test is the gold standard for peanut ripeness, I’ve learned that combining it with other visual cues makes harvest timing foolproof.
One of the first signs to watch for is foliage yellowing—when your peanut plants’ leaves turn golden-brown and crispy, it’s nature’s way of signaling maturity. This usually happens 2–3 weeks before the pods are fully ready, giving you advance notice to prepare for harvest.
Pay attention to the pegs (stems) extending into the soil—they’ll start drying out and turning brown when the peanuts inside are nearly ready. If you gently tug on these pegs and they snap easily (rather than bending), that’s another strong indicator.
These underground stems harden as the peanuts mature, making them easier to identify without digging.
Don’t overlook the soil conditions around your peanut plants. Mature peanuts need dry soil to develop their full flavor, so if you notice the top 1–2 inches of soil feeling dry to the touch, it’s a sign the plants are nearing harvest time.
Overly moist soil can delay ripening, so adjust your watering schedule if needed to encourage faster maturation.
- 🍂 Leaves turn yellow-brown and crispy (2–3 weeks before harvest)
- 🌱 Pegs dry out and snap easily when tugged (not flexible)
- 💧 Topsoil feels dry (1–2 inches deep) for 3+ consecutive days
- ⏳ Pods develop slowly (growth rate slows 10–14 days before harvest)
- 🌡️ Nighttime temps drop to 60–65°F (signals maturity in cooler climates)
Another subtle but critical clue is the slowdown in pod development. Early in the season, you’ll see new pods forming rapidly, but as they near maturity, the growth rate slows dramatically.
If you’ve been monitoring your plants and notice the pods aren’t expanding as quickly, it’s time to start checking shell hardness more frequently.
In cooler climates (USDA Zones 6–8), watch for nighttime temperature drops to 60–65°F, which triggers the final stages of ripening. This is especially useful if you’re growing peanuts in areas with shorter growing seasons—it helps you time your harvest before the first frost.
Combine this with the shell test for the most accurate results.
Pro tip: I always harvest a few test pods 2–3 days before the full harvest to confirm ripeness. Shell them and taste one—if it’s creamy and fully developed, your peanuts are ready.
If they’re still mealy or underdeveloped, wait another week. This small step saves time and effort in the long run.